- About
- Our Clients
- Resources
- Services
- Blog
- Contact
- About
- Our Clients
- Resources
- Services
- Blog
- Contact
Managing quality can be one of the most challenging aspects of manufacturing a product abroad. As an importer, you’re likely trying to maintain control over how the factory manufactures your product while also asking your supplier to keep you informed about what’s actually happening.

When you encounter problems, it can sometimes feel like you’re at the mercy of the situation, especially when you’re watching it unfold from the other side of the world. As a result, importers tend to approach quality improvement in two ways:
AQL sampling makes stating requirements upfront and verifying them later with inspection much easier for the majority of importers.
In the remainder of this eBook, we’ll explore how AQL benefits most importers, why QC professionals rely on it for inspection, how to use AQL tables, what alternatives to the common industry standard for AQL exist for importers and more.
Read along, email a PDF to yourself for later or click the links below to jump to the section that interests you most:
And check out our step by step video on how to use the AQL chart below!
Professionals in the quality control field have been using AQL as the basis for acceptance sampling for decades. Sometimes it’s desirable to inspect an entire order of goods. But in most cases, you’ll benefit more by having inspection staff pull a random sample of units from the total order to check using AQL. Let’s look at why professionals typically use AQL sampling for product inspection.
Acceptance sampling with AQL has early origins. The practice was popularized by Harold F. Dodge and Harry Remig for use by the United States military during World War II. The military faced a problem with the need to test bullets for quality and function. As with many products today, testing bullets was destructive—the bullets themselves were destroyed by the process. So the military had to devise a way to test enough bullets to give them assurance about the quality of a lot without testing so many that none were left to ship to the field. Sampling with AQL addressed these concerns.
 By pulling a sample of bullets at random from a lot, the military was able to test part of the lot and use those results to estimate the quality of the total lot. This ensured that bullets weren’t needlessly destroyed by excessive testing. And based on a history of product quality reported over time, the military was able to further optimize the sample size tested. They could pull a larger sample for testing when variance or other factors contributed to lower quality or pull a smaller one when product quality was more consistent.
In the same way, if you’re manufacturing a product that requires destructive testing, such as composition testing for fabric, using acceptance sampling with AQL can help you manage quality while limiting waste.
Many importers believe that the more units of their product they inspect, the more confident they can be about the quality of an order. And they’re right. You’ll have a more complete overview of quality by checking a greater number of units. And no sampling plan offers you more transparency than a 100-percent inspection of your order.
But some importers fail to recognize two important considerations:
Let’s say you’re importing 2,500 tablet PCs from a factory in Shenzhen, China. You require QC staff to conduct a number of standardized on-site tests for your product. Aside from basic function tests, such as checking power ON/OFF, touch screen, camera, playback and Bluetooth connection, there’s also a barrage of nearly 15 other tests required for your product. If an inspector needs 5 minutes to perform all of these tests, it would take them more than 208 hours to inspect all 2,500 tablets.

Assuming 8 hours in a workday, you’d need one inspector working for 26 days to inspect 100 percent of your order in this example. For most importers, 26 days is way too much time to spend checking an order before it ships, especially if you wait until the order is packaged. And your supplier won’t likely be willing to wait 26 days before shipping to allow for this inspection.
In contrast, if you chose to inspect using AQL sampling in this example, the highest possible sample size for your lot of 2,500 tablets would be 200 units.
 If all factors remain unchanged except the number of units checked, this inspection could be completed by a single inspector in about 2 days using AQL sampling. And because AQL relies on statistics, you’d still be able to make an informed decision regarding whether or not to ship the order based on the results of this inspection.
We can see that inspecting a sample of goods using AQL typically requires less time than inspecting 100 percent of an order. But what’s the difference in cost?
Some importers choose to rely on QC staff at the factory to ensure their product meets their standards. But most tend to insist on outside inspection, often hiring professionals based near their supplier’s factory to inspect on their behalf. When you’ve hired a contractor or a third-party inspection company that’s billing you based on time—often expressed in “man-days”—100 percent inspection can be expensive.
The 100-percent inspection of tablet PCs in the earlier example required 26 days to complete. If a single inspector charges $250 per day, that’s a total of $6,500 billed for inspecting just one order. Whereas, in the 2-day inspection checking a sample of 200 units, the same inspector would bill you only $500 for the service—that’s quite a difference!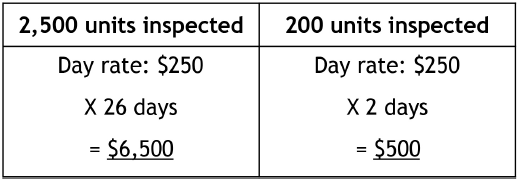
There are cases where you may benefit from 100-percent inspection over inspecting a sample with AQL. For example, if your shipment is a relatively small quantity or a trial order, the cost and time needed to inspect every unit may not be unreasonable. And a higher retail price for certain products, like luxury bags, may justify 100-percent inspection.
Importers sometimes suggest pulling a sample of 10, 15, 20 percent or some other portion of a lot for inspection, rather than using AQL. But although you may think this is the best approach, it’s actually less efficient to check an arbitrary percentage of units in an order.
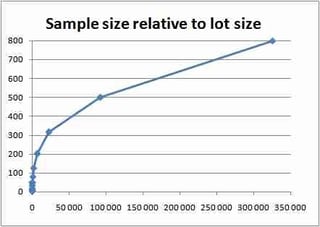 As the statistics governing AQL sampling will show, the greater your lot size the relatively fewer units you’ll need to check to get the same confidence in the inspection result. At some point, inspecting a fixed percentage means spending more time checking more units without offering greater transparency. In these cases, AQL inspections yields equally-reliable results without the need to check as many units.
A professional QC company can often recommend what they feel is an appropriate inspection method. But ultimately the decision about how many units to check must be made by you, the importer, based on your product, budget, appetite for risk and other factors (related: When Should You Use AQL for Inspection?). Most importers of consumer and industrial products will find that an inspection using AQL sampling is best for them most of the time.
Before delving into a step-by-step process for AQL sampling and interpreting the results of inspections that use it, let’s first look at the different parts of a standard AQL chart and what each represents.
The predominant AQL standard used by QC professionals in the product inspection field is ANSI ASQ Z1.4. The standard was developed by the American National Standards Institute (ANSI) and the American Society for Quality (ASQ), formerly called the American Society for Quality Control (ASQC). This is the standard most commonly applied today in attribute sampling for consumer and industrial products. We’ll look more at the different types of sampling standards and how each is used in Chapter 5.
The ANSI ASQ Z1.4 standard AQL table includes eight parts, which we’ve highlighted in orange in each diagram:
Lot size is your order quantity—the total number of units in your shipment of goods. Despite how many units you anticipate you’ll be checking during inspection, your total lot size should be used as a starting point with the AQL chart. Lot sizes appear on the chart as a range of quantities. If you have an order of goods with a total quantity of 315 units, for example, you’d use the lot size range “281 to 500” in the AQL chart.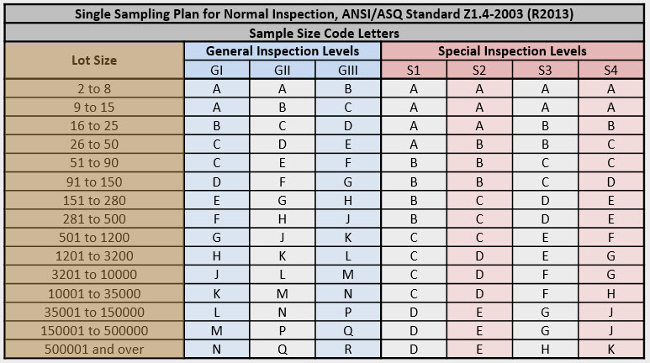
Inspection levels are the main determinant of how many units you’ll pull for inspection, or your sample size. General inspection levels are most commonly used for inspection procedures that will be applied to your entire main sample size. You or your inspector would perform visual inspection procedures, such as examining a piece of furniture for any defects or nonconformities, on every unit in your sample.
General inspection levels are divided into three categories, ranging from the smallest option (GI) to the largest (GIII) corresponding to your lot size. Typically, the larger your sample size, the more costly and time-consuming your inspection will be. For this reason, you can consider GI to be your “budget option”, offering a relatively narrow inspection scope. GIII tends to be the most expensive option, but offers the widest scope and greatest transparency of the inspection levels.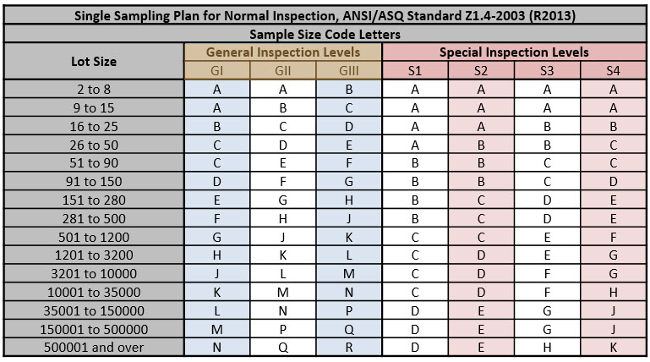
Like general inspection levels, special inspection levels help determine the sample size that you’ll use for inspection. But special inspection levels are divided into four categories, rather than three, ranging from S1 to S4. They tend to use sample sizes much smaller than those for general inspection levels corresponding to your lot size. Also, unlike general inspection levels, these are normally used for “special” tests or inspection procedures.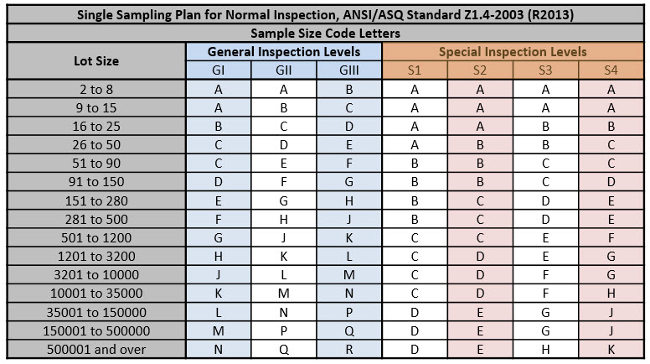
It’s often unnecessary to conduct certain product tests and checks on every unit in the main sample size. For example, measuring dimensions of many units isn’t necessary for products like injection-molded components. Since the parts come from the same mold, you can expect that their dimensions are consistent throughout mass production.
Similarly, you likely won’t want to bother conducting a test for fabric composition on every piece in your main sample. Fabric composition testing often destroys the fabric by burning, and material composition rarely varies significantly between sections or rolls of fabric in a lot. Some tests also require special equipment and may take considerable time to perform. So it’s often costly and inefficient to carry out these kinds of procedures on more units than necessary.
Instead, you may feel that testing five pieces, three pieces or a single piece gives you the assurance that you need. Special inspection levels help you determine the appropriate sample size in these cases.
Sample size code letters represent the different sample sizes you might use for inspection with AQL. These letters appear on both pages or sides of the ANSI ASQ Z1.4 standard AQL chart. The same sample size letters often appear in the rows of multiple lot size ranges and in the columns of multiple general and special inspection levels. For example, sample size letter “D” is an option for 11 different lot size ranges and all inspection levels.
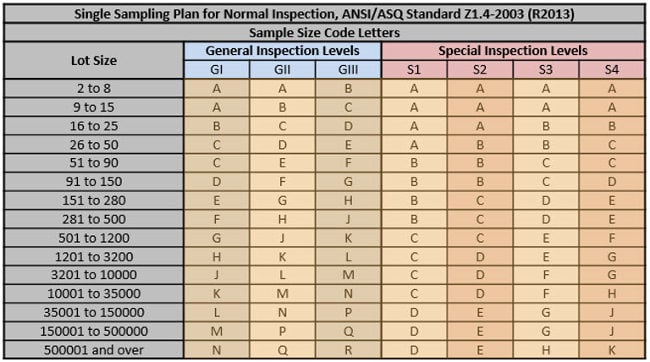
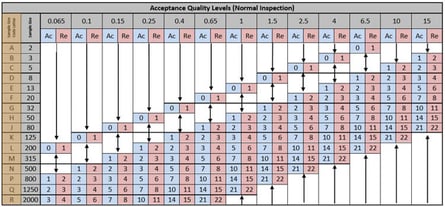
You can find sample sizes on the second page or backside of the AQL chart. These are the number of units that you’ll pull, usually at random, and test or check during inspection. Sample sizes shown in the chart range from 2 units to 2,000 units.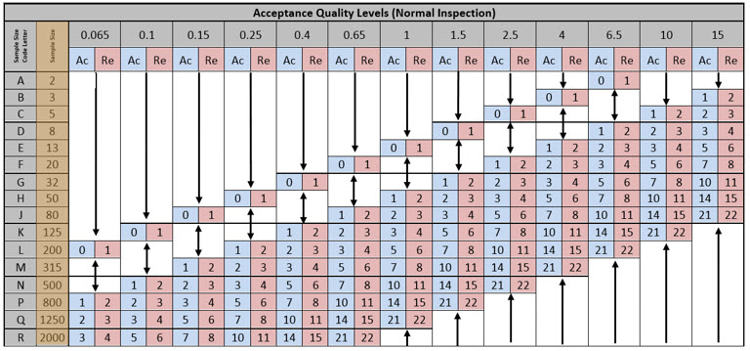
An acceptable quality level (AQL), recently renamed acceptable quality limit, represents your tolerance for defects or nonconformities in an order. More specifically, AQL is the worst level of quality that you’ll accept—the highest percentage of goods with a particular type of defect or nonconformity that you’ll allow in the order. For example, you might accept torn upholstery on only 1.5 percent of the chairs you’re manufacturing in China. So you would choose an AQL of 1.5, which corresponds to this tolerance.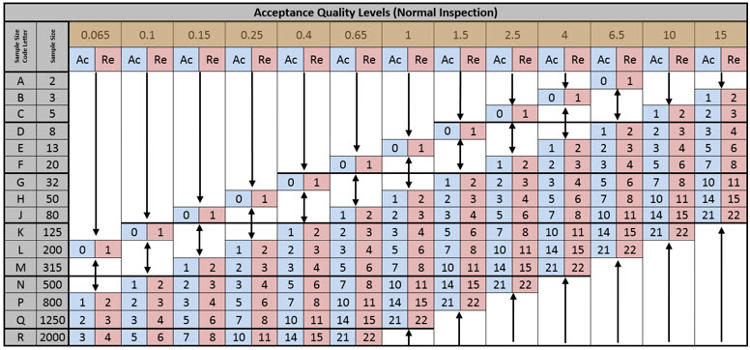
Acceptance points, shortened to “Ac” on the AQL table, are the maximum number of defects or nonconformities allowed in a given sample size for a given AQL. These are directly proportional to AQLs, respective of sample size. That is, as your tolerance for particular quality problems increases, so does the maximum number of defects allowed in a sample, or your acceptance point.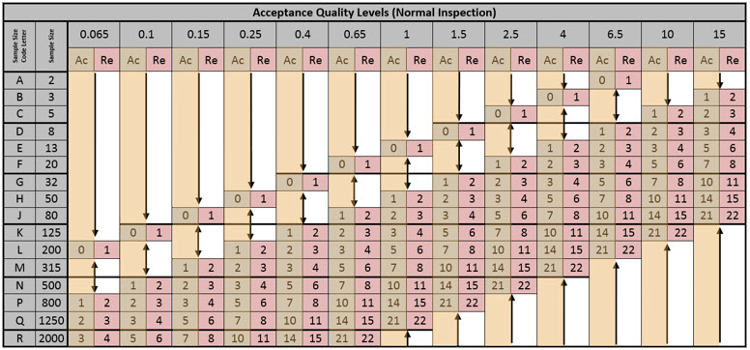
Rejection points, shortened to “Re” on the AQL table, represent the threshold for rejecting an order based on the number of defects or nonconformities in a sample at a given AQL. The rejection point is always one unit greater than the corresponding acceptance point. For example, if you’ve chosen an AQL of 1 percent and are inspecting a sample of 80 units, you’d accept the order if inspection finds as many as 2 defects. You’d reject the order if you find 3 or more defects.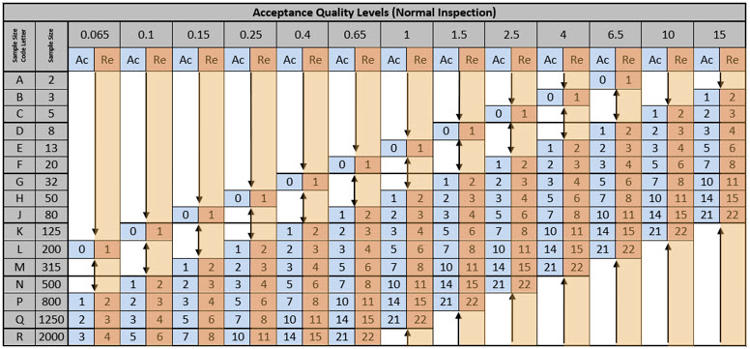
You’ll notice that the AQL chart has arrows pointing to acceptance and rejection points at certain sample sizes. These show that, although you may begin with a particular sample size, according to your lot size and chosen inspection level, you may require a larger sample size to give you confidence at some AQLs. For example, given the relatively strict AQL of 0.065 percent, you’ll need to inspect a sample of at least 200 units to make a reasonable conclusion about the quality of the lot. If you find that the area of the chart containing your sample size at your chosen AQL points to a sample size larger than your total order quantity, you would inspect 100 percent of the order.
Similarly, some of the larger sample sizes may be redundant at some higher AQLs. If you’ve chosen a more lenient AQL of 15 percent, you need only inspect a sample size of 80 units at most, even if your lot size and inspection level call for a larger sample. Inspecting more units will not give you greater confidence in the quality of your order using AQL.
As we’ll see in Chapter 5, there are multiple AQL standards available for inspection. But the basic layout and parts of the AQL chart vary only slightly between these standards. And most of what you’ve learned about this chart will help you interpret and apply the other standards.
Now that you have a basic understanding of all the parts of an ANSI ASQ Z1.4 standard AQL chart, let’s connect the dots by seeing how each part comes together during the sampling and inspection process.
Most importers can begin using the AQL chart as soon as they know their total order quantity and have an idea of quality expectations and product requirements. In fact, it’s best to determine how the AQL chart will be used for inspection before mass production even begins. In this way, you can ensure that your supplier understands what minimum quality standards you expect them to meet.
Let’s look specifically at what quality expectations you’ll need to set before using AQL.
Most importers have a different tolerance level for different kinds of defects. If you’re manufacturing refrigerators, you’d probably consider a small scratch in the outside coating to be less serious than you would a broken hinge on the door. For this reason, most product inspectors will attempt to separate different defects into one of the following three categories based on importance:
By notifying your suppler of any known quality defects common to your product and classifying them by severity, you hold them more accountable for these issues. Likewise, you can be confident that inspection staff will verify your product using your standard if you can inform them of how each known defect should be reported. One of the best ways that experienced importers clarify defects, and other product expectations, is by working together with their supplier and QC staff to develop a detailed QC checklist.
If you’re unsure of what known quality defects exist for your product or how to classify them, a professional inspector with experience in your product type can often advise (related: 3 Types of Quality Defects in Different Products).
Since AQL represents your relative tolerance for quality defects, and you have different tolerances for different defects, you’ll typically assign a different corresponding AQL to critical, major and minor defects. For example, when inspecting consumer goods, QC professionals generally recommend AQLs of 0, 2.5 and 4 percent for critical, major and minor defects, respectively. Note that for an AQL of 0 percent, the rejection point is 1 defect, regardless of sample size—any critical defects found within the sample will result in rejecting the order.
If you’re unsure of which AQLs to apply to your product for each defect type, a QC professional can usually make suggestions based on past experience. And like defect categories, including your chosen AQLs in your QC checklist helps ensure your supplier and inspection team are aware of your quality expectations.
Once you have at least a rough idea of how potential defects for your product will be classified and which AQL will be used for each defect class, you’re ready to use the AQL chart to find your sample size.
Let’s say that you have an order of 300 electric blenders that you want to inspect before shipping. By looking at the lot sizes shown in the AQL chart, you can see that your order quantity falls within the “281 to 500” unit range. Let’s also say that, due to budgetary constraints, you’ve chosen the lowest general inspection level for that lot size—GI. By looking at where your inspection level meets your lot size, you find sample size code letter “F”.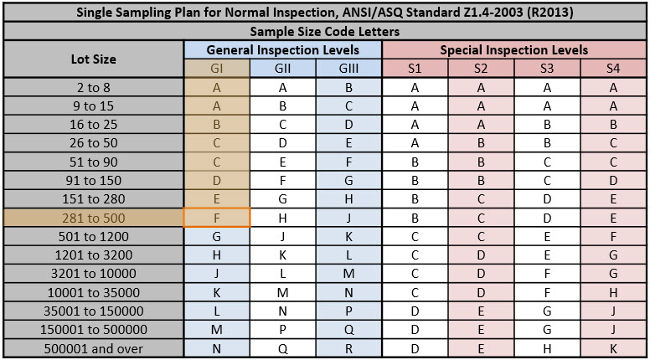
When you look to the second page or backside of the AQL chart, you’ll find that the sample size code letter “F” corresponds to 20 units. Now let’s apply the same AQLs typically used for consumer goods to your blenders. We’ll use 0 percent AQL for critical defects, 1.5 percent for major defects and 4 percent for minor defects. For critical defects, we already know that the rejection point is 1 defect. But when we look at the chart for AQL 1.5, we find an arrow in the column where it meets sample size 20 units.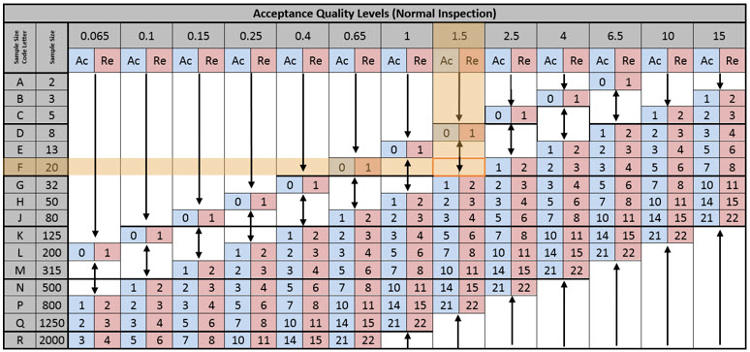
The arrow in the column for AQL 1.5 percent is pointing down to the row below it with a sample size of 32 units. In this case, 32 units is the minimum sample size required to inspect at this AQL. So you must use a sample size of 32 units, instead of 20 units, and use the acceptance point of 1 defect and rejection point of 2 defects.
The column for 4 percent AQL meets the row for your original sample size, 20 units, at the acceptance and rejections points of 2 defects and 3 defects, respectively. But common AQL standards permit you to use the largest sample size for all AQLs when using different classes of defects or nonconformities—a typical practice among QC professionals. And since you’re using a different AQL for minor, major and critical defects, you can use the largest sample size, 32 units, for all three defect classes, rather than using a smaller sample size for minor defects. And with the larger sample size of 32 units, you’ll use the corresponding acceptance point of 3 defects and rejection point of 4 defects for 4 percent AQL.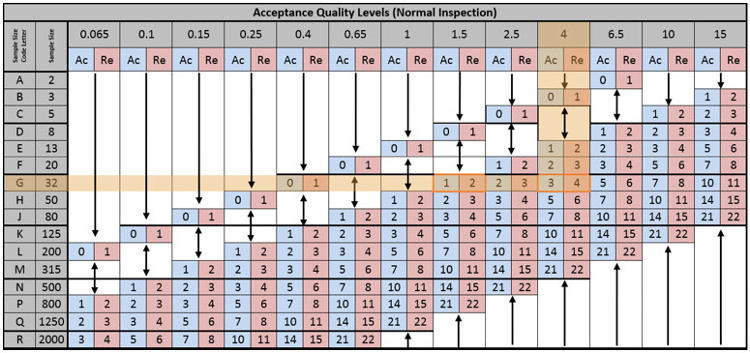
The practical outcome of this is that you’ll be pulling a single random sample of 32 units from mass production and rejecting the order if you find:
If the number of defects you find exceeds any of these three limits, you should reject the order, according to AQL. But as we’ll see in the next chapter, the AQL result is not the only determinant of a pass or fail result for an inspection.
The AQL result is a vital part of inspections that use AQL. But it’s not the only factor in determining if the inspection result is “pass” or “fail”, nor does the inspection result dictate to the importer that they must hold or ship an order (related: What QC Inspection Results Do and Don't Mean for Your Shipment).
Most product inspection reports have an AQL result and an overall result, sometimes called a “general” result. The general result is normally shown at the top of the report and takes into account the AQL result, as well as other factors. A passing AQL result is a necessary condition for a passing general result, though not a sufficient one—an order can fail inspection for reasons other than AQL. Let’s look at these other factors that commonly affect the general result.
The decision to separate different defects into different classes and assign a certain AQL to each class falls on you, as the importer. Likewise, your customers’ expectations should govern the way you treat and report defects. But importers often adjust AQLs and the ways they classify different defects as they continue manufacturing and inspecting their product.
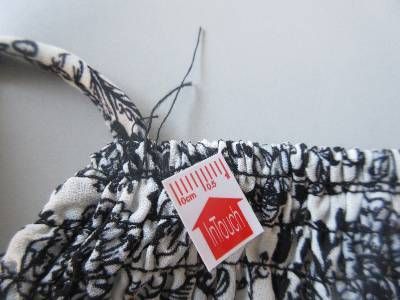 For example, you might initially classify untrimmed threads as a minor defect for a garment. But if you see an unexpectedly high number of customer returns due to untrimmed threads, you may want to consider these major defects, effectively lowering your tolerance for this defect in your goods. This may be a decision you make after seeing the result of inspection, asking the supplier to hold an order and address units with untrimmed threads before shipping. So even though you might have received a passing result, you’ll still want to consider any customer expectations that might alter your decision to ship the order.
Another part of customer expectations that can affect your decision to accept or reject an order is urgency. Your supplier might have fallen behind the production deadline such that you’re willing to accept an AQL result of fail because you urgently need to ship the order. Although a fairly common problem, you can prevent production delays through proper planning and by conducting inspection well in advance of your planned shipping date.
Aside from meeting AQL and customer expectations, most products must pass any on-site tests performed during inspection. These typically include tests for functionality, safety and performance. Although a product may have a passing AQL result, it often fails inspection if it does not pass certain tests.
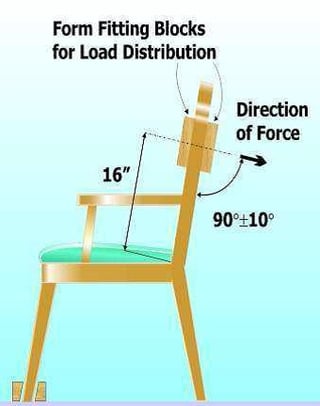 When inspecting an item of furniture, for example, you might subject it to a number of load-bearing tests to ensure it meets a certain standard. Chairs, in particular, often need to be tested to verify they can withstand a reasonable weight load without breaking or deforming. If a chair fails this kind of testing for functionality and safety, you’d probably want to reject the order, regardless of AQL results. Product safety issues can be very dangerous for consumers, as well as potentially resulting in a damaging product recall, as we saw with IKEA’s recent recall of many of the company’s chests and dressers.
Some importers will insist on testing their product to verify a particular performance claim. Wristwatch and other timepiece manufacturers, for example, often make claims of their products’ durability and performance, such as water resistance to a certain depth. Importers often require on-site testing during inspection to verify these. When testing finds that your product fails to live up to its claim, you might want to reject the order, or else risk dissatisfied customers and product returns.
Products sometimes pass all on-site tests and have a passing AQL result, but still have a general result of fail because they don’t meet one or more regulations or distributor requirements. Regulations affect a wide range of products, from garments with requirements for labeling, to FDA regulations surrounding cosmetics. Failure to meet regulations of a particular market can result in your inability to distribute within it.
Aside from legal requirements, many distributors and retailers often impose their own set of requirements on their suppliers’ products. For example, Amazon.com requires that any poly bags for a product have a 5-inch opening or larger, in addition to many other packaging requirements. Just as failure to meet local regulations can shut you out of a market of sale, not adhering to distributors’ standards can limit your distribution channels.
If there are any on-site tests, regulations or distributor requirements that you need to verify in your product, be sure to include these in your QC checklist and share them with your supplier and your inspection team. Otherwise, a passing inspection result that doesn’t include these factors may mislead you into accepting an order you should actually be rejecting.
Remember that your inspector’s main role is to visit the factory, check your product using your standards and report on what they find. They typically cannot tell the factory manager whether to ship the goods. Only you can make that decision. That’s why it’s vital that inspection includes all of your product criteria and addresses all of your concerns. This makes it much easier for you to interpret inspection results and make an informed decision about accepting or rejecting an order.
Attribute sampling using the ANSI ASQ Z1.4 standard for AQL has been the focus of the preceding chapters and is the most commonly used sampling method for inspection by most importers today. But this isn’t the only standard or sampling plan available (related: Alternatives to ANSI ASQ Z1.4 for AQL Sampling During QC Inspection). Let’s briefly explore the other sampling methods and standards manufacturers have used at various times and for various applications.
Attribute sampling is relatively simple because it’s enumerative—it seeks to find the number of units in a sample that meet certain qualitative criteria. Units inspected are simply “defective” or “not defective”, based on the criteria set. As an importer simply trying to find out the number of defects or nonconformities in your total order quantity, attribute sampling is what you want. The main disadvantage to attribute sampling is that you’ll generally need to inspect a relatively large sample size in order to make reasonable conclusions about the quality of the entire order.
Variable sampling is more analytical and complex than attribute sampling because rather than simply reporting whether or not a product meets certain qualitative criteria, you’re reporting the quantitative data. You’re measuring quality characteristics on a continuous scale with variable sampling. 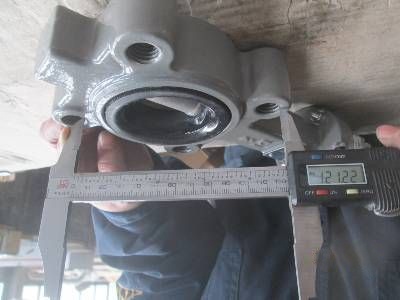 Variable sampling is more commonly used for process control and to make predictions.
For example, if you’re inspecting an industrial valve, you can report nonconformities and defects together using the same attribute sampling plan. But with variable sampling, you’re measuring one particular issue or nonconformity wherever it occurs in your sample. Variable sampling only allows you to check one characteristic per sampling plan. You’d need one sampling plan to measure a particular dimension for the valves and another sampling plan to measure valve pressure. So although variable sampling requires a smaller sample size than attribute sampling plans, you’ll often need to inspect multiple samples.
Aside from attribute or variable varieties, sampling plans are also categorized by the number of samples required. The following are among the more commonly used sampling plans in manufacturing:
 Continuous sampling – with continuous sampling, you typically begin by inspecting 100 percent of the units consecutively produced as they come off the production line. Once you’ve found a certain number of consecutive units to be free of defects and nonconformities, you’d begin checking a random sample. If a single unit in the sample is found to be defective, you’d repeat the process from the beginning, inspecting 100 percent. Continuous sampling is most often used with conveyer line production, or when lot-by-lot inspection isn’t practical.
In addition to sampling plans, there are a number of sampling standards or schemes that have been used for AQL at various times, each developed by a different organization:
These are just a few of the common commercial sampling standards available to you for inspection. Some standards may be ideal for certain situations. If you’re unsure which standard to apply for inspecting your product, consult a QC professional that’s experienced with your product type.
Now you’ve seen why AQL sampling is a key process of most product inspections conducted by QC professionals. You’re familiar with the various parts of most AQL tables used for sampling. And you’re ready to choose a sampling method and standard that’s best for you and your product.
Perhaps most of all, you’ll now benefit from a better understanding of how to interpret most product inspection reports. You’re familiar with the common factors that lead to a product passing or failing inspection. Equipped with this knowledge, you’re able to make the important decision about whether to accept or reject an order of goods. And remember, that’s a decision which only you can make.
Get even more guidance on AQL in the related blogs linked above or download a personal copy of this eBook for yourself below!

Operating
across Asia
in 12 countries and regions
Accreditations
AQSIQ ID : 248
ISO 9001: 2015
& ISO 17020
10+ years
of experience
A long history tells
Worldwide
Sales Offices
America, Europe, Asia
Call Us
Please contact
+86 755 2220 0833 (English, Cantonese, and Mandarin)Write Us
New business inquiries:
sales@asiaqualityfocus.com
Existing customers:
clientsupport@asiaqualityfocus.com